Unordered List

Friday, September 6, 2013

Create Bootable USB


  Friends , want to boot operating system from a usb flash drive?. Today I introducing an easy tool for your needs. Universal USB Installer aka UUI is a Live USB Creator that allows you to choose from a selection of Linux Distributions and Windows Version to put on your USB Flash Drive.

  The Universal USB Installer is easy to use. Simply choose a Live Linux Distribution Or windows versions, the ISO file, your Flash Drive and, Click Install. Upon completion, you should have a ready to run bootable USB Flash Drive with your select operating system installed. Other features include; Persistence (if available) – note that casper persistence will only work with fat16 or fat32 formatted drives.

clip_image001

clip_image002

DOWNLOAD

Universal-USB-Installer-1.9.4.1

MORE Download

Tuesday, August 27, 2013

How To Find Windows 8 Product Key With Belarc Advisor

Today i share a trick to find Windows 8 product key with a useful software named Belarc Advisor. It is a Pc Audit Software and Fully Supports Windows 8.It Analyzes Your Pc by going in Depth.It is one of the best product key finder programs and gave a 100% Result on windows 8.  Belarc Advisor builds a detailed profile of your installed software and hardware, network inventory, missing Microsoft hotfixes, anti-virus status, security benchmarks, and displays the results in your Web browser. All of your PC profile information is kept private on your PC and is not sent to any web server.
 
Belarc Advisor windows 8 key finder(www.masterhacksindia.blogspot.com)
Download Belarc Advisor: Click here


  • Install Belarc Advisor by following whatever instructions are given while installation.
  • Run Belarc Advisor and it will analyze your Pc.Then note down the windows 8 product key displayed in the Software Licenses Section.
  • The Windows 8 Product Key is a combination of 25 letters and numbers and looks something like this xxxxx-xxxxx-xxxxx-xxxxx-xxxxx.
  • Note down the key for further use as you will need while reinstalling windows.

Note:-Take very good care of the letters and numerals while writing the windows 8 product key.If any digit or numeral gets wrong the key will not work.This method will work on most of the versions of windows.

Features

  • Operating Systems: Runs on Windows 8, 2012, 7, 2008 R2, Vista, 2008, 2003, XP, 2000, NT 4, Me, 98, and 95. Both 32-bit and 64-bit Windows are supported.
  • Browsers: Runs on Internet Explorer, Firefox, Safari, Opera, and many others.
  • File size: 3135 KB.
  • License: The license associated with this product allows for free personal use only. Use on multiple PCs in a corporate, educational, military or government installation is prohibited. See the license agreement for details.


Leave a comment………………below…………….

3D Cube Popular Post Widget With Rotating Effect

Hi, Everyone now i share a beautiful popular post cube widget with 3D rotating effect.  This widget work with all blogger template. You can add this on your blogger. Just follow below instruction.. Then try it to add your template…
3d cube popular post widget with rotating effect -(www.masterhacksindia.blogspot.com)

Login to Blogger Dashboard
  • Select Layout option from dashboard side menu.

  • Click “Add Gadget” .

  • Choose “Popular Posts” from given list (If you already have this gadget skip this step).

  • After that hit again on “Add Gadget” and select “HTML/Javascript” option from list.

  • Copy below code and paste it on HTML/Javascript  box.


<style type="text/css"> .cube { width: 200px; height: 200px;} a img { border: none; } #linksCube img { width: 100%; height: 100%; } </style><br /> <script src="http://ajax.googleapis.com/ajax/libs/jquery/1.6.1/jquery.min.js" type="text/javascript"></script><br /> <script type="text/javascript" src="http://accordion-for-blogger.googlecode.com/svn/trunk/jqueryimagecube.js"></script><br /> <script type="text/javascript" charset="utf-8"> $(function () {     $('.popular-posts ul').abupopularcube(); });  </script><br /> <script type="text/javascript" src="http://accordion-for-blogger.googlecode.com/svn/trunk/popularcube.js"></script>

  • Save it and preview.


Leave a comment…… below…………………. If this widget is not working………..

Set Permission and Advanced Option for the Printer

1. Open the control Panel and click view devices and printers.
2. Right click on the printer and select Printer Properties.
3. Select Edit option in the Security tab and then type Contoso\IT as the user to assign
Permissions to.
4. In the list of permission, assign the ability to Manage Printers and to Manage Document.
5. In the Advanced tab, select the Hold mismatched documents option. Review the other print
options available on this tab.
6. In the General tab, in the Location field, type the name of the location where the printer resides
7. Click Preference, and in the Printing Shortcuts tab, set Print Quality to Best.
Review the other printing preference.

Troubleshooting Common Network Related Problems


This demonstration shows how to resolve common network related problems.


  •      Open a command prompt and run the following commands:.

                      clip_image002[4]


Command
Result
*                  Ipconfig /all
Display all network connections for the computer and adapter configurations.
*                  Ipconfig/displaydns
display the contents of the DNS cache.
*                  Ipconfig /flushdns
clear the content of DNS cache.
*                  Ping
the local host.
*                  Ping
the domain controller by using IPv4 address.
*                  Pinging
the domain controller, verifies          connectivity to domain controller by using local host name
*                  Nslookup –d2 domain controller
Provides detailed information about the h
ost name resolution.


     image

Virtual Memory is Low" error message


      Virtual memory is a part of the hard drive that is set aside and used like RAM by the operating system. When the physical RAM is all used up, the operating system begins to use the virtual memory. When the virtual memory is nearly all used up, the "Virtual Memory is Low" warning message will pop up.


Cause


·   Too many programs are running and not enough memory to run.
·   One program is using up a lot of memory.
·   A bad or failing memory chip.
·   A bad or failing hard drive.


Solution 


  • ·         Close open programs

If you have multiple programs open at the same time and they are using up all the physical RAM and nearly all of the virtual memory, this will cause the warning message to pop up. Fixing this requires you to close one or more of your open programs, to free up virtual memory and physical RAM space.

  • ·         Close and then re-open programs

  • ·         Reboot the computer

Rebooting the computer  close all background programs and restore any memory that hasn't been recovered. Reboot the computer and see if the virtual memory errors continue.

  • ·         Replacement of the bad memory chip

  • ·         Repair corrupted sectors on the hard drive (using a hard drive repair utility) or a replacement of the hard drive.

How To Add Automatic Link Source When Others Copy A content From Our Blog

Friends, Now i share a secure system to protect your content. Some peoples try to copy our blog content without permission, You can restrict it with some java code like right click protection, copy protection etc. But some bloggers cant do that, because they provide some codes to peoples. If they apply that scripts visitors cant copy anything from blog. Now i share a trick for some tricky way to restrict copy from blog. This code help to add automatic link source when others copy a content from our Blog.. You can add this lik to your blog. Please follow below instruction… enjoy with Master Hacks

Log in to your Blogger account

  • Go to Design option--> Edit HTML

  • Find (CTRL+F)  </head> tag.

  • Copy the below code, and paste it above </head> tag.


<script type='text/javascript'>
function addLink() {
    var body_element = document.getElementsByTagName('body')[0];
    var selection;
    selection = window.getSelection();
    var pagelink = "<br/><br/> Original Content from: <a href='"+document.location.href+"'>"+document.location.href+"</a><br/>Copyright © Techtoones"; // change this if you want
    var copytext = selection + pagelink;
    var newdiv = document.createElement('div');
    newdiv.style.position='absolute';
    newdiv.style.left='-99999px';
    body_element.appendChild(newdiv);
    newdiv.innerHTML = copytext;
    selection.selectAllChildren(newdiv);
    window.setTimeout(function() {
        body_element.removeChild(newdiv);
    },0);
}document.oncopy = addLink;
</script>

  • Change RED colour with your own words.

  • Save it..


Enjoy ………………………

How To By-Pass SMS Verification Method For Any Website

Friends, This is a tricky method to bypass SMS verification from site. Sometime we are confused about SMS  Verification method.  Because  we don’t know any problems behind this question.  Here a way to  fool  all websites from SMS verification process. If you want to know , How is it? Just follow this post.  You can receive SMS online for FREE and with NO Registration.


  • Select a number from list, 8 options available till now.
Receive SMS Online for FREE and with NO Registration (www.masterhacksindia.blogspot.com)

  • Then give that number on mobile number box on that website where it  asks for verification.

  • Once you have sent the SMS on this number. you will instantly receive your verification SMS on that number.

  • To check your verfication SMS, Just click on that mobile number which you gave and see there will be that SMS.

  • You will see some list. Find your Verification code from that list.
To get your message here send sms text message to (www.masterhacksindia.blogspot.com)

  • Now copy the code in verification SMS and provide it on the  website.

  • Thus you can verify easily using this method.

How To Remove Google Malware Warning From Our Blogger / Website

Friends, Now i sharing a valuable post to remove suspicious link and content from our blogger/ Website. My blogger also affected with some links, because Google shows my Blogger is harmful. I cant recognize, what problem affected in my site. I also search on Google Webmasters Tool. But it not shows any warning. Only Google Chrome shows some warning. Because of these reasons my website ranking decease every day. After some days I got a website to find and reveal what problem affected on my site. Now i share how to remove malware content or link from our blogger . Follow this post and enjoy with wintricks ..
Google Chrome Shows Harful content (www.masterhacksindia.blogspot.com)


  • Paste your URL and hit submit button.
Redleg's BlogspotBlogger Tool online malware finding software(www.masterhacksindia.blogspot.com)

  • Wait 2-3 seconds. It will redirect  another page. It shows what problem affected on your Blogger/Website.
Find Problem affected page (www.masterhacksindia.blogspot.com)

  • Click on Located here link. Now shows  full script of our blog. Red line shows  content is harmful.
Problem finded (www.masterhacksindia.blogspot.com)

  • Find that code from our blogger/website. Please check Page elements OR Templates.
Now i find What problem affeced on my blog. I removed it(wwww.masterhacksindia.blogspot.com)

  • Remove it.  Now site is clean .enjoy….

How To Add Stylish Star Rating Widget Into Your Blogger Posts

Friends, You know, what is star ratting?. This is a term to review your posts by visitors. Now i share ten different type advanced star rating widget for your blog. You can install it easily on your blogger. It make a  professional feeling about your blog. This widget also shows voting rate and viewers count. If you want to install it in your blogger. Please follow this post ..
How To Add Star Rating Widget Into Your Blogger Posts (www.masterhacksindia.blogspot.com)

First Log into your Blogger account.

  • Go to Template option.

  • Click on Edit Template button.

  • Find (CTRL+F)  </head> tag.

  • Paste Following Code Just Above </head> tag.

<link type="text/css" rel="stylesheet" href="http://static.graddit.com/css/graddit.css"/>


  • After that Find (CTRL+F) <data:post.body/> Tag. If you see more than one.  Find (CTRL+F) below code.

<b:if cond='data:blog.pageType == &quot;item&quot;'><data:post.body/> </b:if>


In case that you need to place rating widget under the post title paste it before <data:post.body/> tag.
Example Like This:
 
<b:if cond='data:blog.pageType == &quot;item&quot;'> Code Here <data:post.body/> </b:if>


In case that you need to place the rating widget in the end of the post place it after the <data:post.body/> tag.

Example Like This:
 
<b:if cond='data:blog.pageType == &quot;item&quot;'><data:post.body/>Code Here  </b:if>


  • Paste following Widget code after your Decision.(Select one widget from below list)

NO:1- Ratings + Social Bar

Ratings   Social Bar (www.masterhacksindia.blogspot.com)


<b:if cond='data:blog.pageType != &quot;static_page&quot;'>
<div expr:id='"labels_" + data:post.id' style='display: none; visibility: hidden;'>
<b:if cond='data:post.labels'>
<b:loop values='data:post.labels' var='label'>
<data:label.name/>,</b:loop></b:if></div>Rate this posting: <div class="ffbs_rating_wrapper">
<div expr:id='data:post.id' class='ffbs_rate ffbs_rate_border ffbs_centered' data-label-rating='icon' data-label-views='icon' data-label-votes='icon'>{[[&#39;&lt;img src=&quot;http://static.graddit.com/img/star_blue.png&quot;/&gt;&#39;]]}</div>
<div expr:id='&quot;ffbs_stats_&quot; + data:post.id' class='ffbs_stats ffbs_centered'></div>
<div expr:id='&quot;share_&quot; + data:post.id' class='ffbs_share ffbs_share_border ffbs_centered'></div></div>
<script type='text/javascript' expr:src='&quot;http://www.graddit.com/rate/eng/5/&quot; + data:post.id + &quot;?id=&quot; + data:post.id + &quot;&amp;stats=ffbs_stats_&quot; + data:post.id + &quot;&amp;labels=labels_&quot; + data:post.id + &quot;&amp;info=info-&quot; + data:post.id + &quot;&amp;info_delay=2&amp;url=&quot; + data:post.url + &quot;&amp;class_star=ffbs_star_img&amp;class_star_set=ffbs_star_img_set&amp;class_star_vote=ffbs_star_img_vote&amp;views=yes&amp;votes=yes&amp;average=yes&amp;share=ffbs_share_&quot; + data:post.id + &quot;&quot;'></script></b:if>


NO:2- Like

Like rating widget (www.masterhacksindia.blogspot.com)


<b:if cond='data:blog.pageType != &quot;static_page&quot;'>
<div expr:id='"labels_" + data:post.id' style='display: none; visibility: hidden;'>
<b:if cond='data:post.labels'>
<b:loop values='data:post.labels' var='label'>
<data:label.name/>,</b:loop></b:if></div>Rate this posting: <div expr:id='data:post.id' class='ffbs_rate'>{[[&#39;&lt;span style=&quot;color: rgb(108, 181, 216);&quot;&gt;&#10084;&lt;/span&gt;&#39;]]}</div>
<div expr:id='&quot;ffbs_stats_&quot; + data:post.id' class='ffbs_stats'></div>
<script type='text/javascript' expr:src='&quot;http://www.graddit.com/rate/eng/1/&quot; + data:post.id + &quot;?id=&quot; + data:post.id + &quot;&amp;stats=ffbs_stats_&quot; + data:post.id + &quot;&amp;labels=labels_&quot; + data:post.id + &quot;&amp;info=info-&quot; + data:post.id + &quot;&amp;info_delay=1&amp;url=&quot; + data:post.url + &quot;&amp;votes=yes&quot;'></script></b:if>


NO:3- Pictures

Picture rating Widget (www.masterhacksindia.blogspot.com)


<b:if cond='data:blog.pageType != &quot;static_page&quot;'>
<div expr:id='"labels_" + data:post.id' style='display: none; visibility: hidden;'>
<b:if cond='data:post.labels'>
<b:loop values='data:post.labels' var='label'>
<data:label.name/>,</b:loop></b:if></div>Rate this posting: <div expr:id='data:post.id' class='ffbs_rate'>{[[&#39;&lt;img src=&quot;http://static.graddit.com/img/star.png&quot;/&gt;&#39;]]}</div>
<div expr:id='&quot;ffbs_stats_&quot; + data:post.id' class='ffbs_stats'></div>
<script type='text/javascript' expr:src='&quot;http://www.graddit.com/rate/eng/5/&quot; + data:post.id + &quot;?id=&quot; + data:post.id + &quot;&amp;stats=ffbs_stats_&quot; + data:post.id + &quot;&amp;labels=labels_&quot; + data:post.id + &quot;&amp;info=info-&quot; + data:post.id + &quot;&amp;info_delay=2&amp;url=&quot; + data:post.url + &quot;&amp;class_star=ffbs_star_img&amp;class_star_set=ffbs_star_img_set&amp;class_star_vote=ffbs_star_img_vote&amp;views=yes&amp;votes=yes&amp;average=yes&quot;'></script></b:if>


NO:4 -Pictures + feedback

Picture and Feedback rating widget(www.masterhacksindia.blogspot.com)


<b:if cond='data:blog.pageType != &quot;static_page&quot;'>
<div expr:id='"labels_" + data:post.id' style='display: none; visibility: hidden;'>
<b:if cond='data:post.labels'>
<b:loop values='data:post.labels' var='label'>
<data:label.name/>,</b:loop></b:if></div>Rate this posting: <div expr:id='data:post.id' class='ffbs_rate'>{[[&#39;&lt;img src=&quot;http://img.graddit.com/img/ice_star.png&quot;/&gt;&#39;, &#39;&lt;img src=&quot;http://img.graddit.com/img/red_star.png&quot;/&gt;&#39;]]}</div>
<div expr:id='&quot;feedback_&quot; + data:post.id' class='ffbs_feedback'>{[&quot;Useless&quot;, &quot;Boring&quot;, &quot;Need more details&quot;, &quot;Perfect&quot;]}</div>
<div expr:id='&quot;ffbs_stats_&quot; + data:post.id' class='ffbs_stats'></div>
<script type='text/javascript' expr:src='&quot;http://www.graddit.com/rate/eng/5/&quot; + data:post.id + &quot;?id=&quot; + data:post.id + &quot;&amp;stats=ffbs_stats_&quot; + data:post.id + &quot;&amp;&amp;feedback=feedback_&quot; + data:post.id + &quot;&amp;labels=labels_&quot; + data:post.id + &quot;&amp;info=info-&quot; + data:post.id + &quot;&amp;info_delay=2&amp;url=&quot; + data:post.url + &quot;&amp;class_star=ffbs_star_fimg&amp;class_star_set=ffbs_star_fimg&amp;class_star_vote=ffbs_star_fimg&amp;average=yes&amp;views=yes&amp;votes=yes&quot;'></script></b:if>


NO:5- Animated

Animated rating widget ( www.masterhacksindia.blogspot.com)


<b:if cond='data:blog.pageType != &quot;static_page&quot;'>
<div expr:id='"labels_" + data:post.id' style='display: none; visibility: hidden;'>
<b:if cond='data:post.labels'>
<b:loop values='data:post.labels' var='label'>
<data:label.name/>,</b:loop></b:if></div>Rate this posting: <div expr:id='data:post.id' class='ffbs_rate'>{[[&#39;&lt;img src=&quot;http://img.graddit.com/img/gifs/star_1.gif&quot;/&gt;&#39;, &#39;&lt;img src=&quot;http://img.graddit.com/img/gifs/5stars_1.gif&quot;/&gt;&#39;, &#39;&lt;img src=&quot;http://img.graddit.com/img/gifs/star_1v.gif&quot;/&gt;&#39;], [&#39;&lt;img src=&quot;http://img.graddit.com/img/gifs/star_2.gif&quot;/&gt;&#39;, &#39;&lt;img src=&quot;http://img.graddit.com/img/gifs/5stars_2.gif&quot;/&gt;&#39;, &#39;&lt;img src=&quot;http://img.graddit.com/img/gifs/star_2v.gif&quot;/&gt;&#39;], [&#39;&lt;img src=&quot;http://img.graddit.com/img/gifs/star_3.gif&quot;/&gt;&#39;, &#39;&lt;img src=&quot;http://img.graddit.com/img/gifs/5stars_3.gif&quot;/&gt;&#39;, &#39;&lt;img src=&quot;http://img.graddit.com/img/gifs/star_3v.gif&quot;/&gt;&#39;], [&#39;&lt;img src=&quot;http://img.graddit.com/img/gifs/star_4.gif&quot;/&gt;&#39;, &#39;&lt;img src=&quot;http://img.graddit.com/img/gifs/5stars_4.gif&quot;/&gt;&#39;, &#39;&lt;img src=&quot;http://img.graddit.com/img/gifs/star_4v.gif&quot;/&gt;&#39;], [&#39;&lt;img src=&quot;http://img.graddit.com/img/gifs/star_5.gif&quot;/&gt;&#39;, &#39;&lt;img src=&quot;http://img.graddit.com/img/gifs/5stars_5.gif&quot;/&gt;&#39;, &#39;&lt;img src=&quot;http://img.graddit.com/img/gifs/star_5v.gif&quot;/&gt;&#39;]]}</div>
<div expr:id='&quot;ffbs_stats_&quot; + data:post.id' class='ffbs_stats'></div>
<script type='text/javascript' expr:src='&quot;http://www.graddit.com/rate/eng/5/&quot; + data:post.id + &quot;?id=&quot; + data:post.id + &quot;&amp;stats=ffbs_stats_&quot; + data:post.id + &quot;&amp;labels=labels_&quot; + data:post.id + &quot;&amp;info=info-&quot; + data:post.id + &quot;&amp;info_delay=2&amp;url=&quot; + data:post.url + &quot;&amp;class_star=ffbs_star_aimg&amp;class_star_set=ffbs_star_aimg_set&amp;class_star_vote=ffbs_star_aimg_vote&amp;views=yes&amp;average=yes&amp;votes=yes&quot;'></script></b:if>


NO:6 -Symbols

Symbol rating widget (www.masterhacksindia.blogspot.com)


<b:if cond='data:blog.pageType != &quot;static_page&quot;'>
<div expr:id='"labels_" + data:post.id' style='display: none; visibility: hidden;'>
<b:if cond='data:post.labels'>
<b:loop values='data:post.labels' var='label'>
<data:label.name/>,</b:loop></b:if></div>Rate this posting: <div expr:id='data:post.id' class='ffbs_rate'>{[[&quot;&#9734;&quot;,&quot;&#9733;&quot;]]}</div>
<div expr:id='&quot;ffbs_stats_&quot; + data:post.id' class='ffbs_stats'></div>
<script type='text/javascript' expr:src='&quot;http://www.graddit.com/rate/eng/5/&quot; + data:post.id + &quot;?id=&quot; + data:post.id + &quot;&amp;stats=ffbs_stats_&quot; + data:post.id + &quot;&amp;labels=labels_&quot; + data:post.id + &quot;&amp;info=info-&quot; + data:post.id + &quot;&amp;info_delay=2&amp;url=&quot; + data:post.url + &quot;&amp;views=yes&amp;average=yes&amp;votes=yes&quot;'></script></b:if>


NO:7- Sequence

Sequence rating widget (www.masterhacksindia.blogspot.com)


<b:if cond='data:blog.pageType != &quot;static_page&quot;'>
<div expr:id='"labels_" + data:post.id' style='display: none; visibility: hidden;'>
<b:if cond='data:post.labels'>
<b:loop values='data:post.labels' var='label'>
<data:label.name/>,</b:loop></b:if></div>Rate this posting: <div expr:id='data:post.id' class='ffbs_rate'>{[[&quot;&#9312;&quot;,&quot;&#10102;&quot;],[&quot;&#9313;&quot;,&quot;&#10103;&quot;],[&quot;&#9314;&quot;,&quot;&#10104;&quot;],[&quot;&#9315;&quot;,&quot;&#10105;&quot;],[&quot;&#9316;&quot;,&quot;&#10106;&quot;]]}</div>
<div expr:id='&quot;ffbs_stats_&quot; + data:post.id' class='ffbs_stats'></div>
<script type='text/javascript' expr:src='&quot;http://www.graddit.com/rate/eng/5/&quot; + data:post.id + &quot;?id=&quot; + data:post.id + &quot;&amp;stats=ffbs_stats_&quot; + data:post.id + &quot;&amp;labels=labels_&quot; + data:post.id + &quot;&amp;info=info-&quot; + data:post.id + &quot;&amp;info_delay=2&amp;url=&quot; + data:post.url + &quot;&amp;views=yes&amp;average=yes&amp;votes=yes&quot;'></script></b:if>


NO:8- Thumb up/down

Thumb up down  rating widget (www.masterhacksindia.blogspot.com)


<b:if cond='data:blog.pageType != &quot;static_page&quot;'>
<div expr:id='"labels_" + data:post.id' style='display: none; visibility: hidden;'>
<b:if cond='data:post.labels'>
<b:loop values='data:post.labels' var='label'>
<data:label.name/>,</b:loop></b:if></div>Rate this posting: <div expr:id='data:post.id' class='ffbs_rate'>{[[&#39;&lt;img src=&quot;http://static.graddit.com/img/thumbup_small.png&quot;/&gt;&#39;],[&#39;&lt;img src=&quot;http://static.graddit.com/img/thumbdown_small.png&quot;/&gt;&#39;]]}</div>
<script type='text/javascript' expr:src='&quot;http://www.graddit.com/rate/eng/2/&quot; + data:post.id + &quot;?id=&quot; + data:post.id + &quot;&amp;labels=labels_&quot; + data:post.id + &quot;&amp;info=info-&quot; + data:post.id + &quot;&amp;info_delay=2&amp;url=&quot; + data:post.url + &quot;&quot;'></script></b:if>


NO:9 -Up/down arrows

Up down arrows rating widget (www.masterhacksindia.blogspot.com)


<b:if cond='data:blog.pageType != &quot;static_page&quot;'>
<div expr:id='"labels_" + data:post.id' style='display: none; visibility: hidden;'>
<b:if cond='data:post.labels'>
<b:loop values='data:post.labels' var='label'>
<data:label.name/>,</b:loop></b:if></div>Rate this posting: <div expr:id='data:post.id' class='ffbs_rate'>{[[&quot;&#8593;&quot;],[&quot;&#8595;&quot;]]}</div>
<script type='text/javascript' expr:src='&quot;http://www.graddit.com/rate/eng/2/&quot; + data:post.id + &quot;?id=&quot; + data:post.id + &quot;&amp;labels=labels_&quot; + data:post.id + &quot;&amp;info=info-&quot; + data:post.id + &quot;&amp;info_delay=2&amp;url=&quot; + data:post.url + &quot;&quot;'></script></b:if>


NO:10- Only Tracker


<b:if cond='data:blog.pageType != &quot;static_page&quot;'>
<div expr:id='"labels_" + data:post.id' style='display: none; visibility: hidden;'>
<b:if cond='data:post.labels'>
<b:loop values='data:post.labels' var='label'>
<data:label.name/>,</b:loop></b:if></div>Rate this posting: <div expr:id='data:post.id' class='ffbs_rate'>{[[&quot;&quot;]]}</div>
<script type='text/javascript' expr:src='&quot;http://www.graddit.com/rate/eng/0/&quot; + data:post.id + &quot;?id=&quot; + data:post.id + &quot;&amp;labels=labels_&quot; + data:post.id + &quot;&amp;url=&quot; + data:post.url + &quot;&quot;'></script></b:if>


  • Save your Template. enjoy.

Start your Windows 8 in Safe Mode with networking

Start Windows 8 in Safe Mode with networking
1. Press the Windows key    + C, and then click Settings.

             image
2. Click Power, hold down Shift on your keyboard and click Restart.
              image
3. Click Troubleshoot.
             image
4. Click Advanced options.
          image
5. Click Startup Settings.
          image
6. Click Restart.
            image

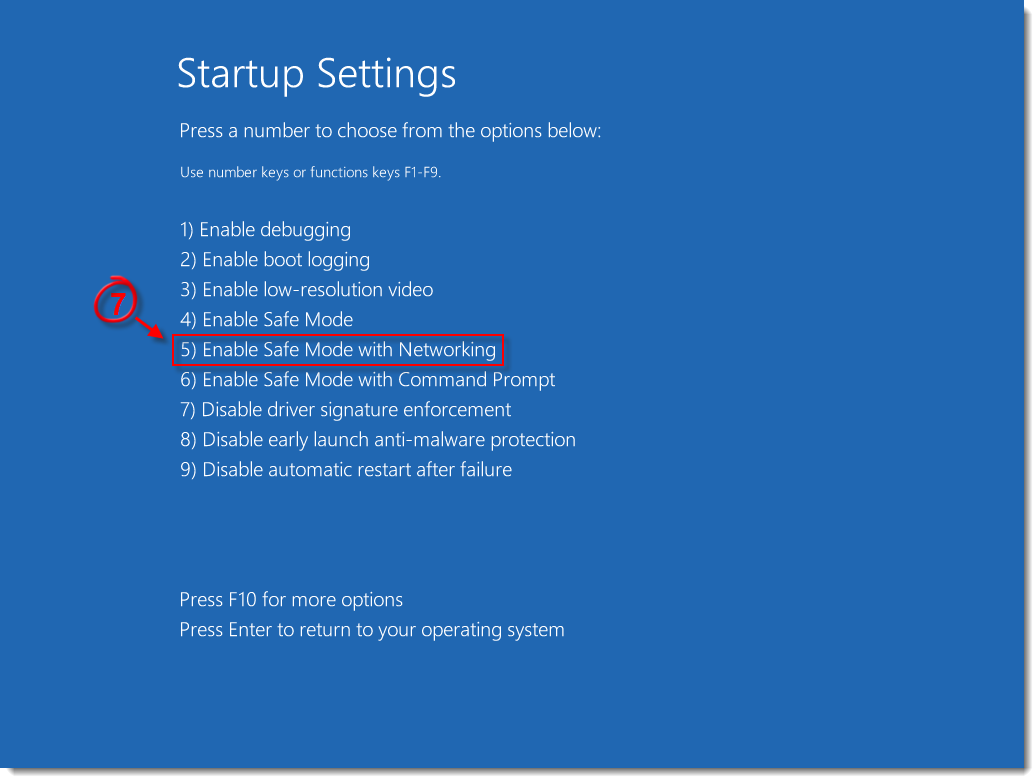
7. Press 5 on your keyboard to Enable Safe Mode with Networking. Windows will start in Safe Mode with Networking.  
            start Windows in Safe Mode or Safe Mode with Networking

Load Your Menu Faster on windows(xp,vista,7,8)

Go to Start then Run
    image
Type 'Regedit' then click 'Ok'
Find "HKEY_CURRENT_USER\Control Panel\Desktop\"
Select "MenuShowDelay"
        image
Right click and select "Modify'
Reduce the number to around "100"
       image
This is the delay time before a menu is opened. You can set it to "0" but it can make windows really hard to use as menus will open if you just look at them - well move your mouse over them anyway.

Enable GodMode in Windows 8

   There is a simple way to access a hidden "God Mode" in Windows 7,Vista and in 8.If you want to Enable GodMode in Windows . Just create a folder on the desktop and name it whatever you like. After that, select Rename. Now just add the following to the end of the folder name:
like:
    All Settings.{ED7BA470-8E54-465E-825C-99712043E01C}

                  image

When you do this, the icon on the folder changes into one that is exactly the same as the Control Panel.
                   image
However, if you click on the new GodMode icon, you’ll get a folder with a bunch of links to all kinds of settings on Windows 8. It’s nice because it even breaks it down by category.
  image

911 Attack on Notepad

image

      Now the World Trade Center attack can be seen on a simple Notepad file. Let’s begin this trick with the bit of information – The flight number of the respective flight that hits twin tower was Q339.  However,  new notepad versions change it recently. So you have to change 9 to N.

Let’s Try,
   1) Open a new notepad file.
   2) Type Q339        Write N instead of 9 in latest versions
                    image
                      image
3) Increase the font size to 72
4) Change the font type to “Wingdings”

nokia Lumia 925

        
          Lumia 925 is the latest flagship of Nokia.Lumia 925 is engineered with Nokia’s powerful PureView technology with an 8.7MP camera with Zeiss optics. It also features Nokia’s Pure Motion HD+ technology with Optical Image Stabilization and 1080p video recording.
       Also onboard is a feature that “chops out” moving objects or people from your images, eliminating those pesky photo bombers. With that out of the picture, the Hipstamatic app takes care of posting your photos to your social media accounts.

Since it runs Windows Phone 8, Lumia 925 users not only get to enjoy the Metro UI, but also get easy access to Microsoft Office and SkyDrive.
    Nokia furnishes the Lumia 925 with a polycarbonate body and stylish aluminum, with a 1.5GHz dual-core Snapdragon chip clocking inside it. The display is a 4.5-inch AMOLED screen protected by Gorilla 2 Glass. The screen features ClearBlack technology and sunlight readability.
The Lumia 925 is wireless-charging enabled and comes in white, grey and black.
  The Nokia Lumia 925 will be available locally starting 19 August 2013 for PHP 23,500 at Nokia Stores and at Nokia Solutions Partners. It will also be exclusively available to Smart subscribers, and will come FREE when bundled with the Smart Unlimited Data Plan 1500, with a 30-month lock-in period.

Tuesday, July 9, 2013

How To Add Images Directly into Facebook Comment Box

Now Facebook updated new feature to upload images directly to comment box. You can directly upload images from your computer to Facebook comment box. Later we does some trick to makeup an iname into comment box. Now Facebook officially give a way to  upload images in to comment box. Its very easy procedure. Just follow this post and enjoy with master hacks.

Choose the photo you want to add in comment from your desktop and press enter.(www.masterhacksindia.blogspot.com)


Log in your Facebook account .


  • Go to Home page.


  • Click on Camera button, you see on comment box.

How To Add Images Directly into Facebook Comment Box (www.masterhacksindia.blogspot.com)


  • Then select an image from you computer.


  • After complete uploading, Just hit Enter key.

Now Facebook updated new feature to upload images directly to comment box.(www.masterhacksindia.blogspot.com)


  • Now you will see images on comment box..


Leave a comment about this post….

Sunday, July 7, 2013

India puts its first Navigation satellite in orbit


The Indian space agency(ISRO) successfully put its first navigation satellite - the Indian Regional Navigation Satellite System-1A (IRNSS-1A) - in the geosynchronous orbit at 27 degrees to the equator.
image

            India’s Polar Satellite Launching took place from Satish Dhawan Space Centre in southeastern India on .The orbit-raising activities were done from the mission control facility at Hassan in Karnataka. The rocket flew in the PSLV-XL configuration, which was first used in 2008 to launch the Chandrayaan 1 spacecraft to the Moon.
         To date, the PSLV-XL has made three flights – also deploying the GSAT-12 communications satellite, and the RISAT-1 radar imaging satellite. The PSLV-XL is a four-stage carrier rocket augmented at liftoff by six boosters. The second and fourth stages are liquid-fuelled, while the first and third stages and boosters use hydroxyl-terminated polybutadiene-based solid propellant. The first stage is a PS1, which utilities an S-138 solid rocket motor. During the early stages of flight, six PS0M-XL strap-on solids, powered by S-12 motors, will augment the first stage’s thrust. The use of PS0M-XL solids, in place of the smaller S-9 powered PS0M solids used on the regular PSLV, is the main difference between the PSLV-XL and the standard PSLV. The second stage of the PSLV, the PS2, is powered by an L40 Vikas engine, derived from the Viking engine developed for the European Ariane rocket. It is fuelled by UH25 propellant – a mixture of unsymmetrical dimethylhydrazine and hydrazine hydrate, and uses dinitrogen tetroxide as oxidizer. The third stage, or PS3, has an S-7 solid motor. The final stage is the PS4, which burns monomethylhydrazine oxidised by MON-3 – a mixture of nitric oxide, dinitrogen tetroxide and nitrogen dioxide. The PS4 is powered by two L-2-5 engines.
                    image

        The launch vehicle placed the 1,425-kilogram IRNSS-1A satellite into its intended elliptical orbit with an apogee of about 20,600 kilo meters and a perigee of 280 kilo meters with an inclination of 18 degrees with respect to the equator. "From there, it will be taken to a geosynchronous circular orbit of 36,000 [kilometers] with 29 degrees inclination," according to ISRO.  Everything connected with IRNSS-1A is normal and the satellite is slowly floating towards its final intended circular geosynchronous orbit at 55 degrees East location with an inclination of 29 degrees to the equator.
                                      image